linux系统下rsync + inotify 数据实时同步
rsync + inotify 数据实时同步
一、rsync简介
rsync是linux系统下的数据镜像备份工具。使用快速增量备份工具Remote Sync可以远程同步,
支持本地复制,或者与其他SSH、rsync主机同步
二、rsync三种命令
Rsync的命令格式常用的有以下三种:(与ssh类似)
rsync [OPTION]… SRC DEST (本地服务器之间:复制)
rsync [OPTION]… SRC [USER@]HOST:DEST (上传)
rsync [OPTION]… [USER@]HOST:SRC DEST (下载)
1、 rsync [OPTION]… SRC DEST
服务器(源):
[root@server tmp]# touch a
[root@server tmp]# ls
a
[root@server tmp]# rsync -a a filea
[root@server tmp]# ls
a filea
2、 rsync [OPTION]… SRC [USER@]HOST:DEST (上传)
服务器(源):
[root@server tmp]# rsync -avz a root@192.168.100.30:/tmp
The authenticity of host ‘192.168.100.30 (192.168.100.30)’ can’t be established.
ECDSA key fingerprint is SHA256:R7/1dpul7cu8SnefsN2wQw5hKDL+xekk0ffasLS6OGI.
ECDSA key fingerprint is MD5:81:88:a1:16:52:83:c0:d5:59:ad:2b:3a:d5:52:02:bc.
Are you sure you want to continue connecting (yes/no)? yes
Warning: Permanently added ‘192.168.100.30’ (ECDSA) to the list of known hosts.
root@192.168.100.30’s password:
sending incremental file list
a
sent 80 bytes received 35 bytes 6.57 bytes/sec
total size is 0 speedup is 0.00
客户端(目标):
[root@stw3 tmp]# ls
a
[root@server tmp]# rsync -avz root@192.168.100.30:/tmp/b .
root@192.168.100.30’s password:
receiving incremental file list
b
sent 43 bytes received 80 bytes 7.45 bytes/sec
total size is 0 speedup is 0.00
[root@server tmp]# ls
a b filea
三、rsync+inotify
1、rsync的优点和缺点
优点:rsync与传统的cp、tar备份方式相比,rsync具有安全性高、备份迅速、支持增量备份等优点,
通过rsync可以解决对实时性要求不高的数据备份需求,例如定期的备份文件服务器数据到远端服务器,
对本地磁盘定期做数据镜像等。
缺点:首先,rsync同步数据时,需要扫描所有文件后进行比对,进行差量传输。如果文件数量达到了百万甚至千 万量级,扫描所有文件将是非常耗时的。而且正在发生变化的往往是其中很少的一部分,这是非常低效的方式。
其次,rsync不能实时的去监测、同步数据,虽然它可以通过linux守护进程的方式进行触发同步,但是两次触发动作一定会有时间差,这样就导致了服务端和客户端数据可能出现不一致,无法在应用故障时完全的恢复数据。
2、inotify
inotify是一种强大的、细粒度的、异步的文件系统事件监控机制,linux内核从2.6.13起,加入了inotify支持,通过inotify可以监控文件系统中添加、删除,修改、移动等各种细微事件,利用这个内核接口,第三方软件就可以监控文件系统下文件的各种变化情况,而inotify-tools就是这样的一个第三方软件。在前面有讲到,rsync可以实现触发式的文件同步,但是通过crontab守护进程方式进行触发,同步的数据和实际数据会有差异,而inotify可以监控文件系统的各种变化,当文件有任何变动时,就触发rsync同步,这样刚好解决了同步数据的实时性问题。
基于以上原因,rsync+inotify(数据实时同步)组合出现了!
四、配置
(把源服务器上/root/etc目录实时同步到目标服务器的/tmp下)
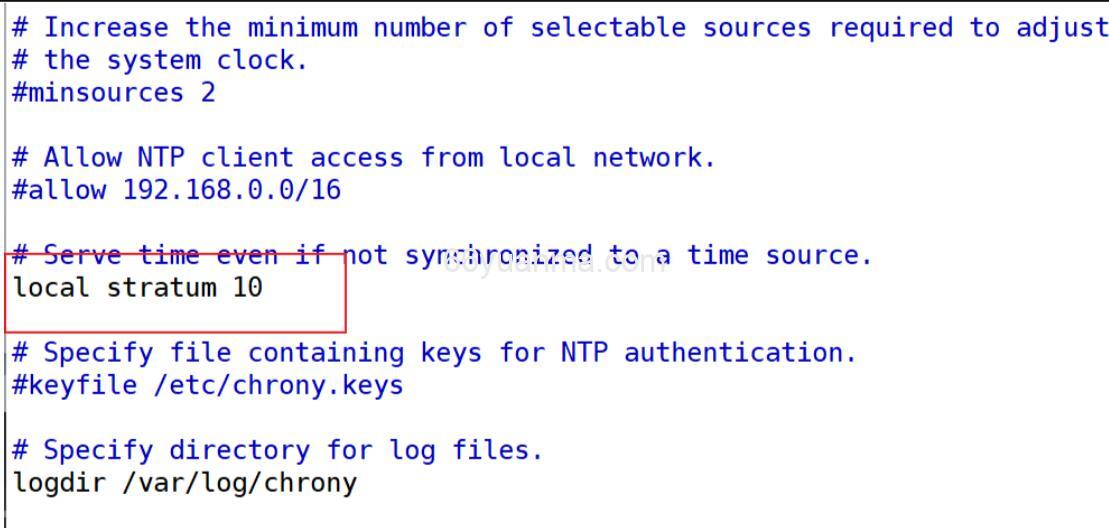
1、源服务器和目标服务器要进行时钟同步
[root@server ~]# vim /etc/chrony.conf
[root@server ~]# systemctl restart chronyd
[root@server ~]# systemctl enable chronyd
Created symlink from /etc/systemd/system/multi-user.target.wants/chronyd.service to /usr/lib/systemd/system/chronyd.service.
[root@server ~]# timedatectl
Local time: Wed 2025-08-20 11:15:45 CST
Universal time: Wed 2025-08-20 03:15:45 UTC
RTC time: Wed 2025-08-20 03:15:45
Time zone: Asia/Shanghai (CST, +0800)
NTP enabled: yes
NTP synchronized: yes
RTC in local TZ: no
DST active: n/a
[root@server ~]# hwclock -w

目标:
[root@stw3 ~]# vim /etc/chrony.conf
[root@stw3 ~]# systemctl restart chronyd
[root@stw3 ~]# systemctl enable chronyd
Created symlink from /etc/systemd/system/multi-user.target.wants/chronyd.service to /usr/lib/systemd/system/chronyd.service.
[root@stw3 ~]# hwclock -w
[root@stw3 ~]# chrony
chronyc chronyd
[root@stw3 ~]# chronyc sources
210 Number of sources = 1
MS Name/IP address Stratum Poll Reach LastRx Last sample
===============================================================================
^? 192.168.100.20 0 7 0 – +0ns[ +0ns] +/- 0ns
2、关闭防火墙和selinux(源和目标主机都要关闭,操作一致)
[root@server ~]# systemctl stop firewalld.service
[root@server ~]# systemctl disable firewalld.service
Removed symlink /etc/systemd/system/multi-user.target.wants/firewalld.service.
Removed symlink /etc/systemd/system/dbus-org.fedoraproject.FirewallD1.service.
[root@server ~]# setenforce 0
[root@server ~]# vim /etc/selinux/config
[root@server ~]# reboot
1. 本站所有资源来源于用户上传和网络,如有侵权请邮件联系站长!
2. 分享目的仅供大家学习和交流,您必须在下载后24小时内删除!
3. 不得使用于非法商业用途,不得违反国家法律。否则后果自负!
4. 本站提供的源码、模板、插件等等其他资源,都不包含技术服务请大家谅解!
5. 如有链接无法下载、失效或广告,请联系管理员处理!
6. 如遇到加密压缩包,请使用WINRAR解压,如遇到无法解压的请联系管理员!
7. 本站有不少源码未能详细测试(解密),不能分辨部分源码是病毒还是误报,所以没有进行任何修改,大家使用前请进行甄别!
66源码网 » linux系统下rsync + inotify 数据实时同步


